Today's
Tuesday's Tip is on how to make a header menu using an image map.
Because this is a more complicated and advanced tutorial I split it up into two parts. The first part is the simple basics for those who don't want to know all the advanced options. (hint: this is the less confusing tutorial) The second part includes all the different options for you image map and is more advanced. (hint: the harder tutorial which takes more time and effort)
But what is an image map anyway? An image map enables you to click on different areas of the image that will direct you to different web pages. My header above uses an image map. If you click on 'Home' it will take you to this blog, 'About Me' will take you to my about me page, and clicking on 'Photography' will take you to my photography blog. Go ahead and try it out! =)
That said here we go!
Part 1: Image Map --the easy way
1. Creating the Image
Open whatever image editing system you would like to use to make your header image. You can make it as fancy or as plain as you would like. I would suggest including your blog name, subtitle/tagline, graphics for decoration, and of course the objects/words that are going to link to different pages of your blog. Just remember that the part that you want to have linked must be in a rectangle shape.
I suggest using
Gimp because it is free and works great for this purpose.
Once you've created your image, upload it to the web. I suggest
MeJuba because it is free, doesn't shrink your images, has unlimited bandwidth, privacy settings, and is easy to use.
2. Creating the Code
Once you have your image, it is time to make the code. Here it is:
<map name="YOUR MAP NAME HERE">
<area shape="rect" coords="x1,y1,x2,y2," href="YOUR LINK HERE" alt="YOUR ALTERNATE TEXT HERE" />
</map>
<img src="YOUR IMAGE LINK HERE"
Usemap="#YOUR MAP NAME HERE">
Now to understand it...
<map name="YOUR MAP NAME HERE"> --this part identifies what map this is and the start of the map
area shape="rect" coords="x1,y1,x2,y2," --this identifies what shape and where the area linked to is (x1 and y1 are the x and y coordinates for the top left corner of the rectangle. In the same way x2 and y2 are the x and y coordinates for the bottom right corner of the rectangle.)
href="YOUR LINK HERE" --this identifies where clicking on the area will take you
alt="YOUR ALTERNATE TEXT HERE" --this is what controls what will show up when you hover over the linked area
</map> --this identifies the end of the map
<img src="YOUR IMAGE LINK HERE" --this makes the image show up--it is not part of the map but rather the html code that will use the map
Usemap="#YOUR MAP NAME HERE"> --this identifies what map to use with the image (don't, don't, don't delete the '#' !!! If you do then your map won't work in IE and Firefox)
Don't worry about filling it out quite yet--we don't have all the information needed
3. Finding the Coordinates
For this part you need to find the coordinates upper left hand corner and lower right hand corner of each rectangle that you would like to be 'clickable.'
Here is how to find them using GIMP
As I don't have any other image editing system I can't show you how to find the coordinates using them. I'm sure you can google it and find an answer or figure it out by yourself.
4. Filling out the Code
Now you have all the information you need to fill out the code
Here is an example of mine all filled out
<map name="headermenu">
</map>
Usemap="#headermenu">
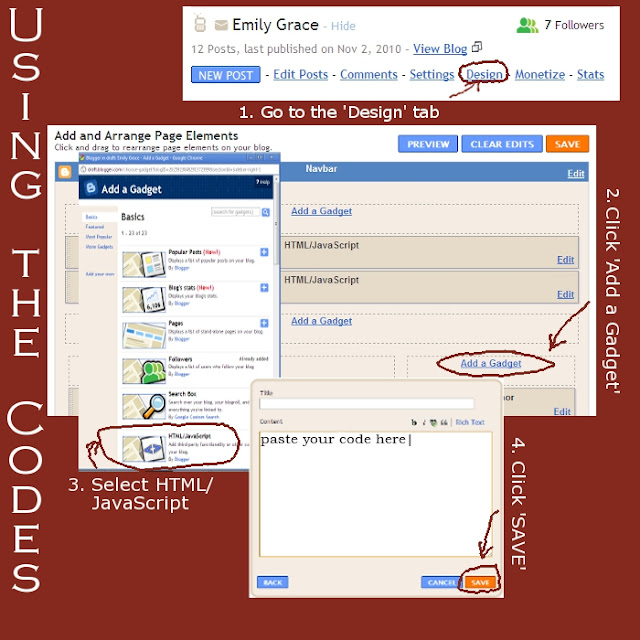
5. Applying the Code
note: you will want to place your gadget at the top of your page so that your header appears at the top of your blog
6. Removing the Original Header
You will need to remove the blogger header to use the header that you have just created. (unless you want two headers. oh, and don't worry, you can always put it back if you'd like)
note: anytime you would like the blogger header back simply add gadget>select header(usually at the bottom of suggested gadgets)
Part 2: Advanced Image Map Options
1. Creating the Image
Open whatever image editing system you would like to use to make your header image. You can make it as fancy or as plain as you would like. I would suggest including your blog name, subtitle/tagline, graphics for decoration, and of course the objects/words that are going to link to different pages of your blog. The part that you want to have linked can be in whatever shape you want--rectangle, circle, or polygon.
I suggest using
Gimp because it is free and works great for this purpose.
Once you've created your image, upload it to the web. I suggest
MeJuba because it is free, doesn't shrink your images, has unlimited bandwidth, privacy settings, and is easy to use.
2. Creating the Code
Once you have your image, it is time to make the code. Here it is:
<map name="YOUR MAP NAME HERE">
<area shape="rect" coords="x1,y1,x2,y2," href="YOUR LINK HERE" alt="YOUR ALTERNATE TEXT HERE" />
<area shape="circle" coords="x,y,r" href="YOUR LINK HERE" alt="YOUR ALTERNATE TEXT HERE"/>
<area shape="poly" coords="x1,y1,x2,y2,x3,y3...." href="YOUR LINK HERE" alt="YOUR ALTERNATE TEXT HERE" />
</map>
<img src="YOUR IMAGE LINK HERE" Usemap="#YOUR MAP NAME HERE">
Now to understand it...
<map name="YOUR MAP NAME HERE"> --this part identifies what map this is and the start of the map
<area shape="rect" coords="x1,y1,x2,y2," --this identifies what shape and where it is for the area linked to is (x1 and y1 are the x and y coordinates for the top left corner of the rectangle. In the same way x2 and y2 are the x and y coordinates for the bottom right corner of the rectangle.)
<area shape="circle" coords="x,y,r" --this identifies what shape and where the linked area is (x and y are the x and y axis values for the center of your circle. r is the length of the radius for your circle--the length from the center of your circle to the outside)
<area shape="poly" coords="x1,y1,x2,y2,x3,y3...." --identifies what shape and where the linked area is
href="YOUR LINK HERE" --this identifies where clicking on the area will take you (x1 and y1 are the first corner values, x2 and y2 are the values for the second corner, etc)
alt="YOUR ALTERNATE TEXT HERE" --this is what controls what will show up when you hover over the linked area
</map> --this identifies the end of the map
<img src="YOUR IMAGE LINK HERE" --this makes the image show up--it is not part of the map but rather the html code that will use the map
Usemap="#YOUR MAP NAME HERE"> --this identifies what map to use with the image (don't, don't, don't delete the '#' !!! If you do then your map won't work in IE and Firefox)
Don't worry about filling out the code yet, you don't have all the information needed.
For this part you need to find the coordinates for each shape that you would like to be 'clickable.'
Here is how to find them using GIMP
As I don't have any other image editing system I can't show you how to find the coordinates using them. I'm sure you can google it and find an answer or figure it out by yourself.
4. Filling out the Code
Now you have all the information needed to fill out the code.
Here is an example of mine filled out:
5. Applying the Code
note: you will want to place your gadget at the top of your page so that your header appears at the top of your blog
6. Removing the Original Header
You will need to remove the blogger header to use the header that you have just created. (unless you want two headers. oh, and don't worry, you can always put it back if you'd like)
note: anytime you would like the blogger header back simply add gadget>select header(usually at the bottom of suggested gadgets)
There you have it! =D I would love to see the result of your work! Leave me a little note below with the link. =)
If you have any questions please let me know in a comment below or by emailing me: emilygrace.ax(at)gmail(dot)com.
As always, any suggestions for a topic for
Tuesday's Tips would be welcome! Right now, I'm thinking of doing a series on comments. After all they are very important and they are what make blogging interactive and not just a monologue. =)
Love in Christ,


