Difficulty--Easy
1. The Code for Snow
<script type="text/javascript" src="http://files.main.bloggerstop.net/uploads/3/0/2/5/3025338/snowstorm.js" />
<!-- now, we'll customize the snowStorm object -->
<script type="text/javascript">
snowStorm.snowColor = '#99ccff'; // blue-ish snow!?
snowStorm.flakesMaxActive = 500; // show more snow on screen at once
snowStorm.useTwinkleEffect = true; // let the snow flicker in and out of view
snowStorm.flakeWidth = 8; //max pixel width for snow element
snowStorm.flakeHeight = 8; //max pixel height for snow element
</script>
And now for explanation of what all that means...<!-- now, we'll customize the snowStorm object -->
<script type="text/javascript">
snowStorm.snowColor = '#99ccff'; // blue-ish snow!?
snowStorm.flakesMaxActive = 500; // show more snow on screen at once
snowStorm.useTwinkleEffect = true; // let the snow flicker in and out of view
snowStorm.flakeWidth = 8; //max pixel width for snow element
snowStorm.flakeHeight = 8; //max pixel height for snow element
</script>
<script
--this starts a script
type="text/javascript"
--this is a text and JavaScript script--the source of the script
snowStorm.snowColor = '#99ccff'; // blue-ish snow!?
--this determines the color of the snow (you can change the #99ccff to any other HTML color) (here is an online HTML color picker)
snowStorm.flakesMaxActive = 500; // show more snow on screen at once
--this determines the amount of snow on your page at a time, you can change the number to whatever you want
snowStorm.useTwinkleEffect = true; // let the snow flicker in and out of view
--this allows the snow to flicker in and out of view, if you would like to change it replace "true" with "false"snowStorm.flakeWidth = 8; //max pixel width for snow element
snowStorm.flakeHeight = 8; //max pixel height for snow element
</script>
--ends the script
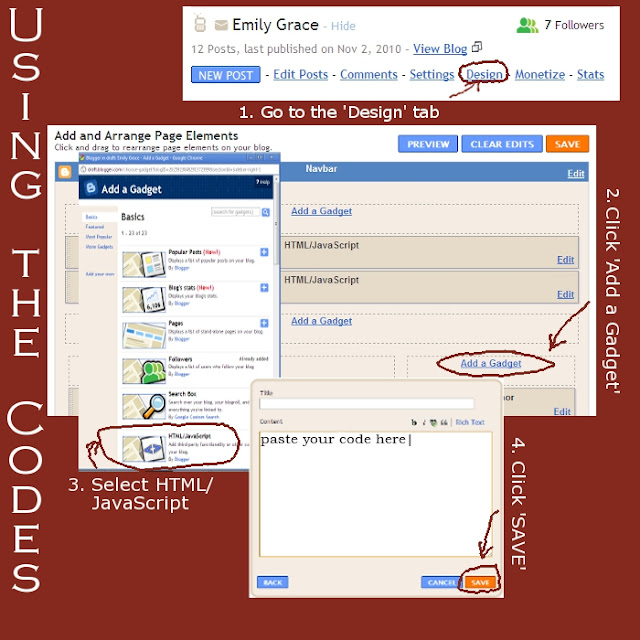
2. Using the Code
When the code is how you want it, paste it into a HTML/JavaScript gadget
When the code is how you want it, paste it into a HTML/JavaScript gadget

If you have any questions just drop me a little note below and I'll get back to you as soon as possible. =)
Next week how to add your own blog background!
As always, I'm open to your suggestions for a subject to cover for Tuesday's Tips.
God bless and have a great day!
Sister in Christ,


13 comments:
This worked really well =} The code you sent me didn't work, but this time it did... not sure what is up with that! Thanks!
Hmm...I must have made a typo in my email to you. Thanks for letting me know that this worked for you! =)
Thanks so much, Emily! You're the only tutorial-ist I've come across who actually explains what each part of the code means, which is very helpful :) And the link to the HTML colour picker is great!
I'm wondering, do you work from the Minima template or the new one? And may I request an imagemap tutorial? Thanks :)
With love,
Annie
You're so welcome, Annie!
I'm using the new blogger template designer templates. Watermark to be specific. =)
I'll start working on an imagemap tutorial. It is a more advanced tutorial that will take longer to write so it might not be ready for a few weeks. You can look forward to it by the end of the year!
Love in Christ,
Emily
Hi Emily! Thanks heaps for leaving that list of blogs for me to share on CYCB (Connecting Young Christian Bloggers)! :D
Thanks so much Emily :) Looking forward to it!
Imagemap tutorial coming out next Tuesday, Annie! =D
Hi Emily,
Just wondering if there was anyway that I could make the snowflakes bigger?
Thanks so much!
In Him,
Bekah
Bekah - Great idea! I updated the code to include the max size of the snow. =)
Emily, Thanks so much! For some reason I couldn't get the snow to change sizes, and I wanted more snow so I just made multiple HTML codes and put them all at the top of my page.
Thanks so much! I love your blog!
In Christ,
Bekah
Hi Emily!
Sorry to bother you but I just wanted to make sure that it's alright if I post a link to your blog on my blog.
Thanks and sorry to bother you!
Bekah - You're so very welcome. I don't mind at all if you put a link to my blog on yours. =)
thanks so much!
Post a Comment
Leave your thought...