Announcing
Tuesday's Tips--Helpful Blogging Tips by Emily Grace!
In response to all your questions about how I designed my blog I will answer them with my blogging tips(tutorials). =)
Today's tip is about blog buttons and how to make a scrolling grab box.
Difficulty--Moderately Easy
1}
creating the button
Create your blog button in whatever image editing software that you use. (I personally use
GIMP because it is free and works well for what I need)
I would include your blog title, possibly your blogging name, your tagline(sub-title of your blog), and your blog url(just in case they can't click on the button). I would also make the design represent your blog's feel and design. Make it represent
you!
2}
uploading the button
Upload your image using whatever image hosting site that you use. (I would suggest
imgur because it is free, doesn't downsize images, has privacy settings, is easy to navigate, and loads quickly)
3}
creating the code
<a href="BLOG URL" target="_blank"><img border="0" alt="ALTERNATE TEXT" src="IMAGE URL"></a>
Alright you have the code, so now we'll dissect it so that you understand what each part does.
href="BLOG URL"
--this is where your blog url will go and this is what makes whoever clicks on your button go to your blog (make sure that you don't delete the quotation marks around the url!!!) *Also make sure that your link starts with 'http://' otherwise you'll get an error when clicking on the button*
target="_blank"
--this is what makes your blog open in a new window
img border="0"
--this creates a border around your button if you don't want a border leave it as zero
alt="ALTERNATE TEXT"
--replace ALTERNATE TEXT with whatever you want to show up when people mouse over the button or if the image doesn't load
src="IMAGE URL"
--this is where you'll put the url of your image and makes the image show up (don't delete the quotation marks around the url!!!)
Don't forget to replace the words in caps with your information.
4}
creating the grab box
<textarea rows="5" cols="23" style="WIDTH: 215px; HEIGHT: 84px">
(YOUR HTML CODE HERE)
</textarea>
Alright you have the code, so now we'll dissect it so that you understand what each part does.
<textarea
--this lets blogger know that this next part needs to be in a text area
rows="5"
--this controls how many rows of text the box will show (it won't delete anything because this is a scrolling box, it just determines how much will be seen without scrolling)
cols="23"
--this controls how many columns of text per row (again, it won't delete anything because this is a scrolling text box)
style="WIDTH: 215px; HEIGHT: 84px"
--this controls the size of your box, you can change the width and height by pixels
</textarea>
--this lets blogger know that this is the end of the text box
Here is an example:
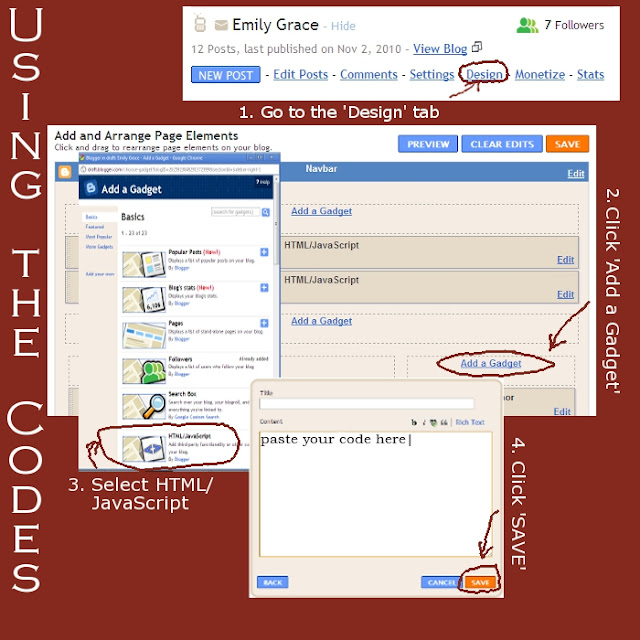
5. Using the Codes
*NOTE: paste both the button code and the grab box code
Your blog button and grab box will now appear just as it does on my sidebar. =)
If you have any questions just drop me a little note below and I'll get back to you as soon as possible. =)
I'd also love to hear what you think of
Tuesday's Tips.
Next week how to add snow to your blog!
God bless and have an awesome day!